In this article, we are going to step through the setup of a series of tools that allow you to use Drafts as a repository of reusable text snippets. Whether it’s canned responses you use in email or fun emoticons for social media, Drafts can be a great place to maintain and access text snippets.
In the process, we’ll touch on how to use a number of Drafts’ features together to create complete workflows. Even if you are not sure you need a snippet repository, you might pick up a few things about workspaces, actions, and other Drafts tools that you can use in other applications.
And, of course, like anything Drafts, there are plenty of places you customize these ideas to your needs.
Overview of the Snippet Setup
In this article, we are going to:
- Create basic snippets: Snippets are just drafts with the tag “snippet”. We will use the first line of the draft as an identifying title and the rest of the text as the snippet.
- Create advanced snippets: The actions will we use support Drafts template tags. We’ll show you how to use this to insert dynamic information (like timestamps) when using a snippet.
- Create a workspace to manage our snippets: Workspaces are sets of filters and options that can be applied to the draft list. We’ll create a workspace that shows only our snippets to make it easier to manage them.
- Install some Drafts actions to work with our snippets: Having a library of snippets is not too useful in and of itself. We’ll install some example actions that let you easily insert snippets when working in Drafts but also copy them to the clipboard to use in other apps.
- Install some Shortcuts to work with our snippets from outside Drafts:
Creating and Managing Snippets
Creating Basic Snippets
Snippets will just be drafts. To create a snippet for our snippet library, do the following:
- Create a new draft.
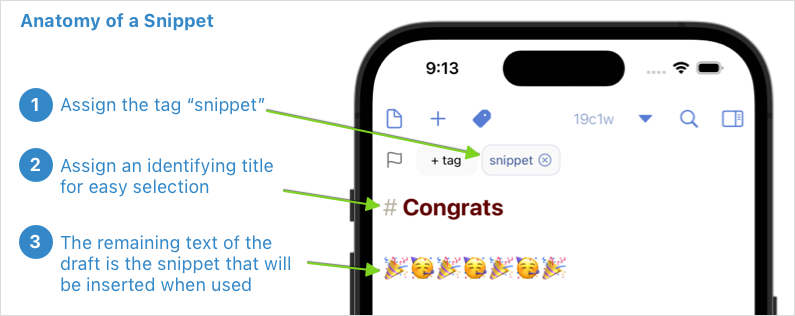
- Assign the tag “snippet” to the draft (not “snippets” plural, be sure to use the singular).
- Use the first line of the text as an identifying title for the snippet to make it easier when selecting from a list.
- The remaining content of the draft after the first line will be used as the snippet content.
- Move the draft to the archive from the inbox. We don’t want our library items cluttering up the inbox, so we’ll store them in the archive.
- Repeat these steps to create a few example snippets for testing - you can always update them later.
Creating Advanced Snippets
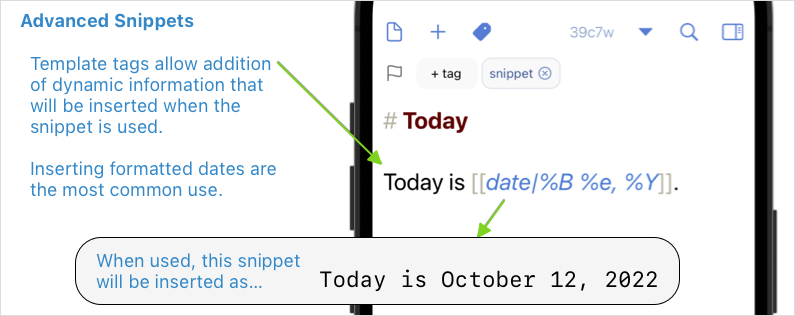
Although many of your snippets might just be static text, the tools we will use to insert snippets also evaluate Drafts’ template tags when fetching the snippet, so you can dynamically insert information.
The most common use would be to insert formatted date/time information. Say you have a snippet you use for a meeting notes template, and when you use the snippet, you would like today’s date inserted.
Getting into the details of template tags is beyond the scope of this article, but if you have uses for this option, see the Using Drafts Templates article for more information.
Creating a Snippet Workspace
Next, we are going to set up a “Snippets” workspace. Workspaces are a way to apply filters and settings to the draft list. Our “Snippets” workspace is going to show us only our snippet library to make it easy to edit and update all our snippets.
If you want to skip a few steps here, you can install the “Snippets” workspace from the Directory.

To create our workspace:
- Go to the Workspace menu, and select “Manage” (downward chevron in a circle above the draft list).
- Create a new Workspace with the “+” button.
- Assign the following options:
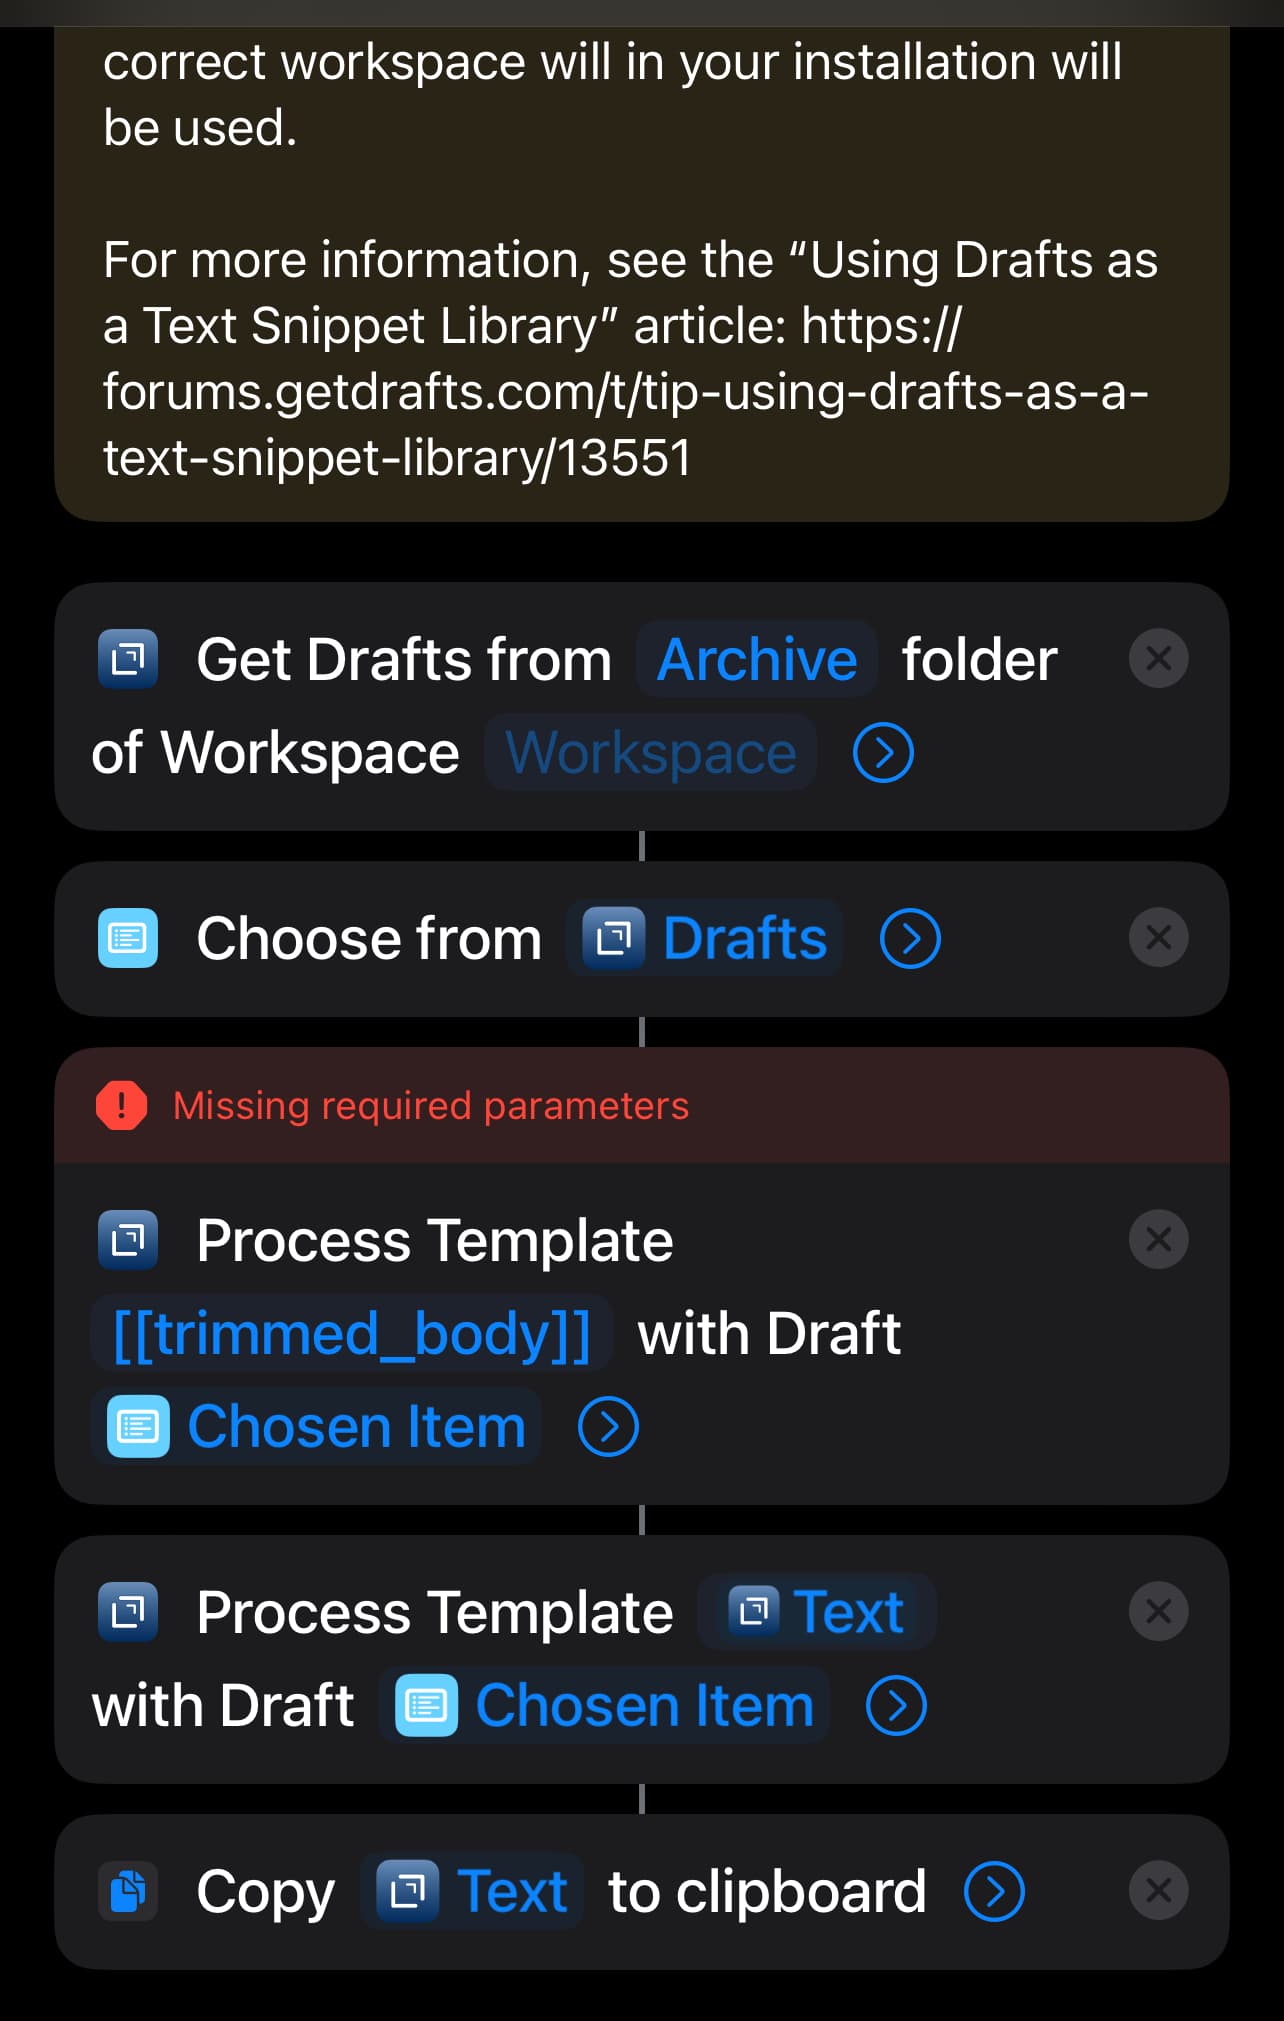
- Name: “Snippets” (the name is important as our example actions will look for the workspace by this name)
- Tag filter: “snippet”
- Sort: Change the sort options for at least the archive to “Text”, set to sort ascending. This is also a preference; you might prefer a date sort order, but using text will keep your snippet list in alpha order by the titles you assign the snippets.
- Display Options: This is my preference, but I suggest turning off all the options to “Show …” (Body preview, tags, etc.) so when the workspace is selected, only the title of the snippet will display in the list for easier selection)
- Select: Archive. You have to scroll down a bit, but this setting tells Drafts to automatically select the “Archive” tab in the draft list when the workspace is applied. Since we are keeping our snippets in the archive, this saves a step.
- Optional, but feel free to select an icon and tint color to suit your preferences.
Now that we have our workspace return to the draft list and apply the workspace by selecting it from the workspace menu. You should see just the snippets we created above, with the “snippet” tag assigned. Anytime you need to modify existing snippets, you can go to this library.
Using Snippets
Snippet Autocomplete
To insert text from one of your snippets while typing in Drafts’ editor, you can use autocomplete. The default Markdown syntaxes all support draft insertion autocomplete. In the case of snippets, type ++ to trigger autocomplete, and keep typing a fragment of your snippet title to filter the list. When you select a draft in the dropdown, the body text of that draft will be inserted at the cursor. For more details, read about autocomplete in the User Guide.
Snippet Actions
Install the Snippets action group from the Directory:
This group contains the following actions:
- Insert Snippet: Prompts to select a snippet from the “Snippets” workspace and inserts the snippet text in the Drafts’ editor as if you pasted it. Use this action when you are composing content in Drafts and want to utilize one of your snippets.
- Copy Snippet: Prompts to select a snippet, as above, but instead puts the snippet text in the system clipboard–ready to be pasted into other apps. Use this when you want to use some of your snippet text in another app.
- Copy Snippet (via Prompt): Similar to “Copy Snippet”, but instead of the draft selection window, this version lists your snippets as buttons in a dialog prompt. This version may be more suitable if you have only a small number of snippets.
- Edit Snippet: Select a snippet, and open the snippet draft in the editor for editing.
- Load Snippet Workspace: Applies the “Snippets” workspace to the draft list. Same as selecting it in the Workspace menu.
TIP: Try the “Copy Snippet” action in a Drafts Grid Widget on your Home Screen or Lock Screen – or add it to Control Center.
Snippet Shortcut
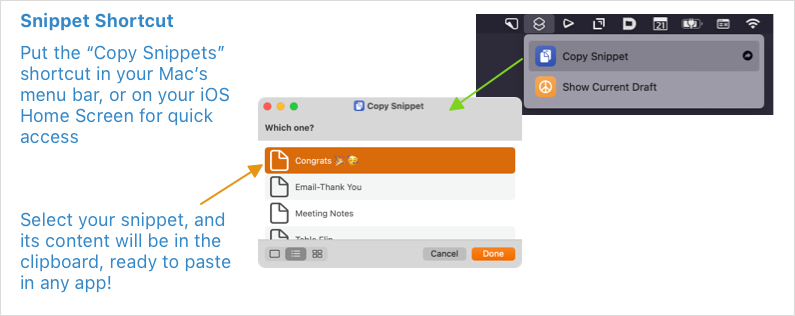
You might now wish to make your snippets more easily accessible from outside Drafts. Apple’s Shortcuts is a great way to integrate your snippet library.
- Copy Snippet Shortcut: Similar to the “Copy Snippet” action above, but implemented in Shortcuts. This shortcut fetches your list of snippets, asks you to select from the list, and puts the result in the system clipboard, ready to paste.
The above works great on Mac if you enable it to show in the “Pin in Menu Bar” option, so it appears in your shortcut list in the main menu and can be accessed from anywhere quickly.
On iOS, you can add this shortcut to your Home Screen or Control Center.
Conclusion
There are many ways this example could be elaborated on or modified for specific needs. Consider it a starting point. Hope this helps some understand how some of the pieces of Drafts can fit together as complete workflows!